Share
Pin
Tweet
Send
Share
Send
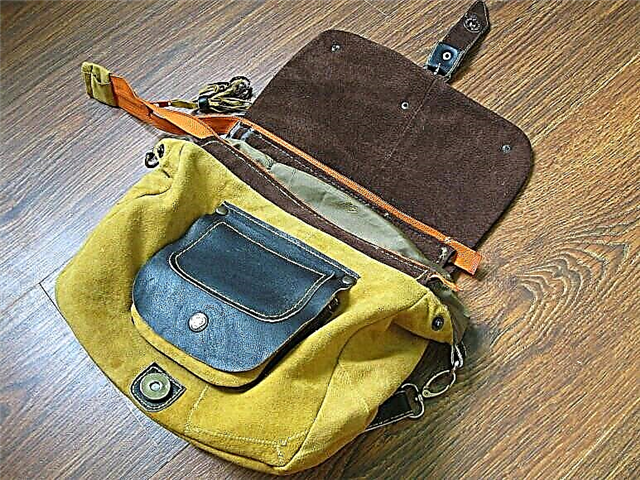
And here it is! I was very interested in this model. Somehow, by a miracle, on one resource I saw patterns of details approximately similar and ... my handbag is not an exact copy of the prototype, but nothing too.


day I went to the shopping mall. Maybe this is called somehow differently, in the university they called it this way - a description of working with nodes - Technological map.
So…
Fittings:
- piercing rivets - 12 pcs;
- magnet fastener - 1 pc;
-decorative clasp - 1 pc;
Zipper for pocket - 1 pc.;
- a zipper for a bag - 1 piece;
- The necessary accessories for the handle.
Cutting:
1 - valve - 2 pcs (brown leather)
2 - the basis of the bag - 2 pcs (terracotta leather)
3 - bag thickness - 2 pcs (seam in the middle of the bottom of the bag) (teracotta leather)
4 - bottom seal - 1 pc (dense material)
- -Offset pocket - 1 pc (terracotta leather)
- - Flap pocket valve - 1 pc (black thick patent leather)
- - Seals for fasteners - 2 pcs (black dense patent leather)
- -Wrapping a pocket on a snake 1 pc (black dense patent leather) (12.2 * 2.2 - this is without allowances !!!)
- -Fixes for handles - 2 pcs. - Width depends on the width of the hardware (black thick leather)
- - Zipper piping - 18 * 2.5 - 4 pcs (brown leather)
- -Wrapping for the partition 23 * 2cm (terracotta leather) - 1 pc.
- -Square 7 * 3cm (black leather) - 4 pcs.
- - Children 2 - 2 pcs.
- -Child 3 - 1 pc with fold
- - patch pocket - 1 pc
- - Thickness of patch pocket-portfolio - thickness 3 cm with allowances - 17 cm - 1 pc.
- - Burlap pocket for children. 2 back - 15 * 9cm - 2 pcs
- - Handbag partition - 21.3 * 15cm - 2 pcs
Det 1, 2,3 (cut into 2 parts along the entire length for sewing in the septum), 4, patch pocket, pocket pocket on the snake, hem zippers, partition handbags.
ALLOWANCE: for all sections of leather parts - 1 cm, for all parts of the lining - 1.5 cm
SEWING:
- 1. Sew the thick leather sealant and stitch it to the patch pocket. Place the bottom of the button on the fastener of the fastener - button ... Treat the patch pocket with a lining. handle pocket bag briefly. Sew flap on patch marking to 2 gears. Fix in corners with rivets (2 pcs). Install the top of the button on the valve.
- 2. for children 2 Use a decorative stitch to sew the fastener seal. Install the bottom of the magnet on the magnate seal.
- 3. On the 2 back end, process the zipped pocket.
- 4. Start children. 3.
- 5. Combine 3 and 2 transfers and 2 tasks - to finish.
- 6. Seal the bottom of the bag - det 4. - glue
- 7. On the top of the det. 1 to grind a decorative fastener, having strengthened this place from the inside out with cardboard. Fold details 1 on the front and grind the bottom and side sections. Notch in the corners, allowances to peel off close to the lines. Unscrew the part and glue it with shoe glue between each other, and iron it. In the corners of the clan, which will be on the upper part, children 2 before, set 2 rivets
- 8. To the upper allowance det. 2 back grind valve bags.
- 9. Fold the partitions of the septum face outward and surround the upper section with teracotta skin. Insert the partitions of the partition between the parts of children 3 and grind off capturing the parts of the partition and one part of children 3 - for further inversion of children 3.Start the lining parts, leaving open the part of the lower cut of the baffle parts and the half of part 3 on the bottom for turning out.
- 10. Stitch fasteners for handles with fittings to the sides of the bag.
- 11. Fasten these parts with 4 rivets.
- 12. Stitch the parts of the detachable zipper into the zipper trim. Side sections are treated with black leather. Stitch edging with parts of zipper to upper allowances of parts 2.
- 13. Place the bag in the lining with the front facing the front. Stitch upper slices. seam allowances to the lining. Unscrew the product and put the lining in the bag. Make sure everything is sewn correctly and with secret stitches sew lining details.
- 14. Prepare the handle. Install accessories on it, fasten with 4 rivets and attach to the bag.
- It took 3 days. I’m very pleased with the handbag ... and ... proud, since everyone was surprised that it was not bought. I will never buy a handbag made of natural materials with my salary of three rubles. So please yourself.
- Thank you all for stopping by. I don’t know the terminology at all, or rather I don’t remember, correct me where it is not written correctly, I will be glad to learn ... this is my first MK. very worried
The bag is sewn according to the materials of the workshop by Tony Andreeva rukodelki-optimistic.blogspot.ru
Share
Pin
Tweet
Send
Share
Send